#knowing how to navigate files and install and program then run that program
Explore tagged Tumblr posts
Visit Tumblr Blog
Explore Tumblr blogs with no restrictions, modern design and the best experience.
Last Seen Tumblr Blogs


Fun Fact
Premium Tumblr themes are available from anywhere between $9 to $49.
Text
things that are easy for you are often actually skills that you have. btw.
#i know i know 'im skilled in sleeping and eating'#but also things like being able to troubleshoot computer issues#knowing how to navigate files and install and program then run that program#these are skills#me being able to read and use dog body language really well is a skill#me being able to research retain and implement the husbandy of several very different types of animals is a ski#skill#whatever you get it
3 notes
·
View notes
Note
im sorry for asking and wasting ur time...how can i get ts2 w ur upload...sorry if im not clear kinda nervous...

edit 3/8/25: one word. magipack. google it and that's way easier than this.
First of all, you're not wasting my time. Treat yourself as kindly as you treat others. /gen /pos
(I'm assuming you are a Windows user. I'm unsure with the state of downloading the game on Linux via Lutris.) With this upload, you will want to download all of them and choose either the x32 or x64 bit Touchup installer. If you have a computer made within the last... 15 years(?) you are using a x64 bit system so just use that.
Pixeldrain has a 6GB download limit daily, which is annoying and I didn't know that until AFTER I uploaded all of it. So you will have to finish downloading it a day later. Yeah It's annoying but the convenient way of doing it was nuked by EA.
Now, navigate to C:\Program Files (x86) and make a folder called The Sims 2 Starter Pack. (This is what I'm used to, so I'll be doing it like this.) You should now have a filepath called [C:\Program Files (x86)\The Sims 2 Starter Pack] and extract all of the expansions in there. You can keep the touchup installer in your downloads. I believe the touchup installer includes RPC, so make sure to play the game through that. Don't forget to run graphics rules maker.
43 notes
·
View notes
Text
How to Download Our Life: Beginnings and Always Mods
(a step-by-step guide!)
If you've ever wanted to download extra content for OLBA but were unsure how or where to even start, this post will hopefully explain everything you need to know!
What you will need:
Our Life: Beginnings and Always
RPA extractor
Latest version of Python
RPA repack tool
1. Finding mods.
As far as I'm aware, there are very few people who make OLBA mods, but if you do happen to come across someone who makes mods/script edits and would like to download them, you'll likely end up with files with the end extension ".rpy" or ".rpyc" Because the software used to make OLBA is Ren'py, these are ren'py script files that basically contain the script that runs the mod and official script files. (Note: Some mods that don't just simply add onto/edit/add more scenes may also include other important resource files (images, sounds etc...) and might be formatted in a ".zip" file. I'll cover how to unzip and use those as well.)
2. Find your game files.
First of all, before you do anything with your .zip or .rpy/.rpyc file(s) you're going to need to find your copy of your OLBA game's files. For Steam, you should be able to open the Steam app on your computer, navigate to your library, right-click your copy of OLBA, select "properties", navigate to the "Installed Files" tab, and click the "Browse" button.
For a direct download of the game such as from Itch.io, you should just be able to navigate to wherever you downloaded your game and find the same results. You should see your game files now like the picture below.
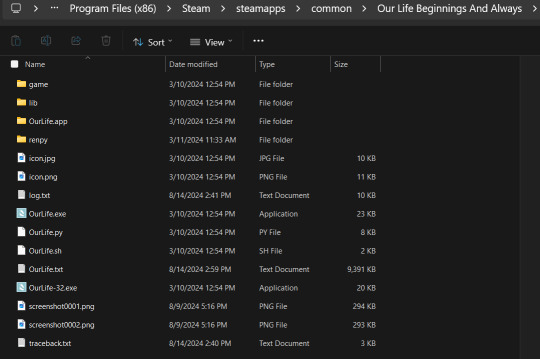
3. Finding/extracting the RPA file.
Now, you are going to want to navigate to the "game" folder inside the OLBA folder. Here you should find these files:
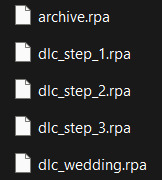
(Note: depending on whether you have the DLC or not, you may or may not have the DLC files. I do not have the Baxter or Derek DLC so I don't have those files here.) These files are basically all the .rpy/rpyc files, along with images, sounds and all other resources for the game, compressed into single files. So, in order to add our modded files, we will need to extract whichever RPA file pertains to the mod. For example, archive.rpa contains all the scripts, etc from the main game. The rest should just be DLC, so if you have a mod that only affects the main game, you will only need to extract that file. The same works if it is a mod that only affects a DLC; you will only need to extract that respective DLC file.
To do this, you can either download this RPA extractor or find your own and follow its steps. For this tutorial, we will be following the steps of the RPA extractor provided. Once you have downloaded the RPA extractor, drag the .RPA file you want to extract out of the OLBA folder, into a new folder, then drag and drop it onto the RPA extractor icon (shown below)
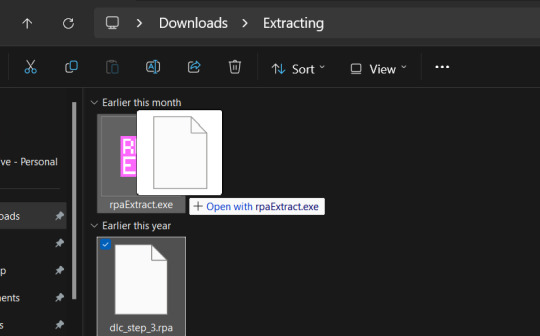
This should open a new Command window where the .rpa file will be extracted. You should end with something like this:
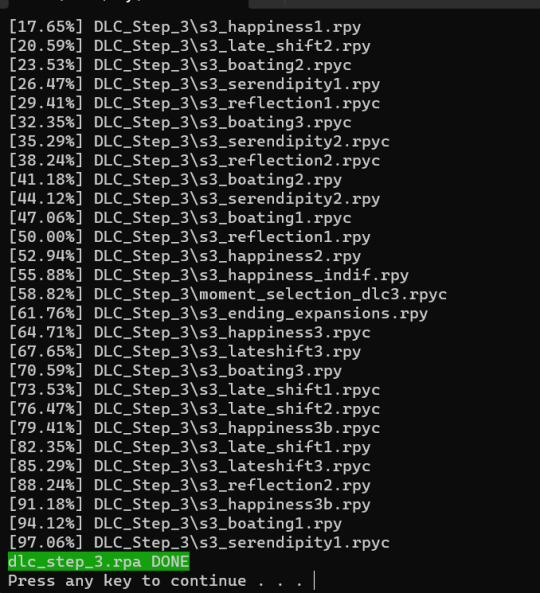
(for this example I extracted the step 3 DLC RPA file)
Now you should have a new folder containing all the .rpy and resource files you need.
4. What to do with modded .rpy/.rpyc and/or .zip files?
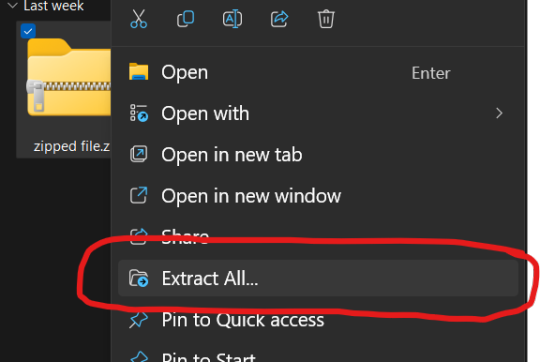
If the mod you downloaded just came with the files not zipped, you can skip this first part. Otherwise, you will need to unzip this zipped folder. To do this, you can either just right-click the zipped file and click "Extract All" and "Extract" when a new window pops up.
Alternatively, you can use a program such as 7-zip, which may help extract speeds for large files. Now, you should have, or already have your modded .rpa files on hand (finally!) Normally, if these files are editing preexisting material from the game or adding new scenes, at least one file, if not all of them will have the SAME EXACT file name as an already existing file. In this case, BEFORE YOU DO ANYTHING go into the folder(s) you got earlier by extracting the .rpa file(s) and look for the file(s) with the same name(s) as your modded .rpy/.rpyc file(s) and either make a copy or move them somewhere safe in case something is wrong with your modded files/you no longer want the modded files, you can put the original files back in. Once you have done this, you are going to drag the modded files directly into the folder(s) you got earlier by extracting the .rpa file(s). MAKE SURE YOU PUT THEM IN THE CORRECT FOLDERS AND EITHER OVERWRITE THE ORIGINAL FILES OR MAKE SURE THEY HAVE BEEN REMOVED.

If there are any other files, such as sounds or images or .rpy/rpyc files, feel free to just make another folder to put these in.
5. Repacking the RPA file.
Now these next steps can get really complicated, so I'll break them down into smaller steps. 1.) Download the RPA repack tool (make sure to unzip it) and the latest version of Python if you haven't already.
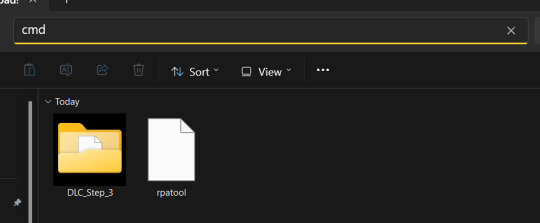
2.) Inside the unzipped "rpa-master" folder you'll find another folder of the same name. Inside this folder all you need is the "rpatool" file. Take this file and move it into a new folder completely outside of the "rpa-master" folder, name this folder whatever you want, it doesn't matter. (EXAMPLE BELOW)
3.) Now take the folder(s) you got from extracting the .rpa file earlier or created and put them in this new folder. (EXAMPLE BELOW)
4.) Type "cmd" into the path while in the folder with both of these.
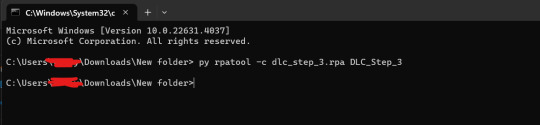
5.) Now, a command prompt window should pop up, type in this:
py rpatool -c
followed by the name of the .rpa file you want to make and the name of the folder(s) you are repacking separated by a space for each. (EXAMPLE BELOW)
6.) Depending on the size of your file it might take some time, but once you see the .rpa file appear in the folder, you're all done! It should look something like this:
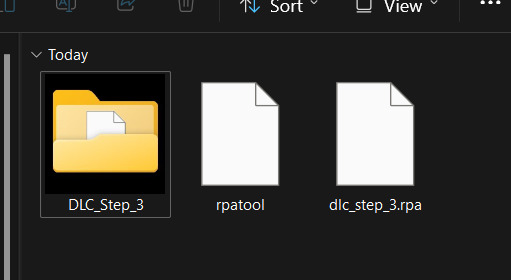
Now, all that's left to do is put that .rpa file into the game folder with the rest of the .rpa files !! After that you can test it out and your mods should now work!
As always if you have any questions or need help doing this yourself, feel free to contact me or submit an ask!
71 notes
·
View notes
Text
@fragilehiggs
HOW TO IMPORT HIGGS 3D MODEL INTO BLENDER / MODELS FROM GAMES INTO BLENDER
figured id make this a post because it’d be easier.. might help other people too!!! on how to put higgs into blender. you probably know some of the stuff i’m gonna explain but for good measure will bring up. this is extremely long because its the sort of thing i wouldve massively appreciated but i unfortunately instead basically had to figure it out going off of little to nothing
—
blender is a 3d program that allows you to import models from games into there which can then be rigged, posed, and animated. people take these models from games using programs called ninjaripper or greyhound. essentially this just goes into the files of the game and takes out the assets. if it’s an asset, it can be taken out. you would then have to rig the model yourself (basically put a skeleton to pose it.) this takes very long and is inconvenient.
luckily, people do this for you. you don’t need to rip your own assets out and rig, which is a hassle and you usually need to pay for these useful programs. a great spot for getting models that have been ripped from games is deviantart. however, there is no telling how these models can perform. they could be badly rigged, or could have messed up textures. unfortunately, such is the case for the one and only higgs model… https://www.deviantart.com/kanbara914/art/Death-Stranding-Higgs-XPS-864224744
the good news is that i fixed the textures. the bad news is that the rigging is absolutely beyond busy. he is poseable, yes, but the amount of points there are makes it really hard to. i’m yet to figure out a better way and might start ripping and rigging my own models. despite having fixed the textures i am unsure if i can export the fixed version. thus.. another tutorial will come through on to do that. unfortunately it takes awhile. all of this requires lots of patience, trial, and error.
so, now, how exactly do we start? FIRSTLY, we need to revisit downloading blender. the current up-to-date blender will NOT work. you need to download blender 2.80, NOT anything else. well, how do you get an older version?
in order to get an older version, navigate to blender.org/download/previous-versions/ and scroll down a bit to you see ‘download any blender version.’ here is a good tutorial but i believe that it is a little outdated so i will explain it furthermore. https://youtu.be/WmlijP9D67o?si=QHhpOQ_D_0LWJP9M this is the one i followed however so, the premise is the same.
we click on download any blender version and it looks quite overwhelming. dont be too worried, you just need to look closely and scroll till you see Blender2.80 . we then click on that and you need to find your operating system. im going to assume you run windows, and if so, pick blender-2.80-windows64.zip from the list.
navigate to your files, and then open up the zip file that you just downloaded. click blender 2.8 again and then what you see is going to look a little busy. dont be fooled, its actually not. just scroll down and find blender.exe. press this and itll bring up a simple process -- all you should have to do is press a few buttons and optimize it like any other download for an application such as blender. it should be installed like regular blender, and if its not on your desktop, simply go to blender.exe in your files in applications. i recommend pinning it to your taskbar.
here comes the next step. there is something called xnalara. i will keep the history of it rather brief but its quite interesting. xnalara was an older program that allowed people back then to rip models from games and import them into the xnalara program. that program is rather old and i rather not use it, however, im thinking about looking into it. its good to use blender regardless because of its studio-accredited attributes. its professional.
some awesome dude later down the line created something called a xnalara add-on for blender. this allowed you to download models ripped from games posted on deviantart that are optimized for xnalara. the file name for these xnalara optimized models end in .xps . these will not regularly be imported into blender, because it doesnt support it. however, this add-on will allow you to do such.
im going to explain how to download it but watching this video regardless is essential. you will probably need to go back to it now and then.
youtube
since youre particularly interested in importing higgs, i will keep it relatively broad but touch on his model a bit more because i am more familiar but this process applies to most models. navigate to https://www.deviantart.com/kanbara914/art/Death-Stranding-Higgs-XPS-864224744 and scroll down into the description of the post. click on the link, mega.nz/file/y88wyQpS#eDkcsSmW… so on and so forth. it will ask you if you want to leave deviantart and click the link again to go there.
you're now in MEGA. this website will allow you to store downloads for people, and i can assure you its safe. i would never download anything im not sure of -- my PC is my baby lol. look down to the bottom right and youll see "SAVE" and "SAVE TO MEGA." pick save. it will download, and you need to look to the top right and click where your downloads are. this will take a couple minutes, grab some water and a snack. when its done, click on it in the tray to open it.
youre going to be overwhelmed by everything you see. do not fret! just close it, dont unzip it. just make sure it exists. you can close MEGA and deviantart now. you now need to refer to the video i linked if you want to follow along with more resources. we need to install the XNALARA add-on for blender 2.80 which can allow us to put it into blender.
before i continue i want to say, being familiar will blender as a whole will be an insane help. unfortunately the only way i figured out some of the stuff that i did was because i knew how to just going off of the program. most tutorials will not have answers for this small issues... but i most likely do especially for this specific model.
here is the add-on. https://github.com/johnzero7/XNALaraMesh . github will look relatively the same as it does in the video. look to your right, youre going to see a bolded 'releases', and under it, XPSTools v2.0.2 or something along the lines of that. you dont need to see the other releases, it's best to have the latest one. click on it.
its going to open up the description of the file. the above is important to note because it says it works with the blender that you just downloaded. if there are any issues for whatever reason with using blender 2.80 (approximately the version from ~2020) those are other versions which are applicable. for the sake of my sanity im gonna explain how to open it in blender 2.80 .
go down to the bolded 'assets'. under it you will see 3 links -- click on the first one which ends in .zip . it will download in the download tray. if your computer tries to flag it or anything as unsafe, click away from that and allow it anyways. this program has been used by thousands for years. it will soon finish downloading. MAKE SURE THE XNALARA ADD ON IS SAVED ON YOUR DESKTOP!!!
go ahead and open up blender 2.80 now. if you have the newest blender installed already make sure youre picking the older version. it will open a terminal alongside of blender, while its running. dont close it. click general.
if you have never used blender, please watch a video on the basics such as this one. https://youtu.be/Z8sg0nHNTTo?si=zjR4aBHVF8XX_Qdn this is the only way to realistically be able to attempt messing with said model, unfortunately. unironically, rendering roblox avatars was a huge stepping stone and aid to my experience with this. i genuinely recommend you do it before you try and do something like this. here is an amazing, step-by-step tutorial that needs no explaining out of the video. https://youtu.be/kpALOtLhX-Q?si=4UrhkBTIK5qYOBfS
from here, this is a much better tutorial to follow >> https://youtu.be/8mqUqob3P3o?si=14a50v88IPZx6O8Y . find yourself at the time stamp of 1:46, the previous is the steps you have already done. go back to blender if you have made it this far, lmao. click on the cube and delete that motherfucker.
look at the top toolbar. it says things like file, edit, render, window, etc. you want to pick edit and scroll to preferences. youll see many options but youre going to want to click add-ons on the left. then, at the top left, click install. go to DESKTOP and click XNALaraMesh.2.02.zip and click install add-on from file on the top right. make sure its the ZIP. this is gonna bring you to a menu with potentially many other downloads. scroll down till you see XNALARA if so. MAKE SURE IT HAS A CLICKED CHECK MARK ON THE LEFT.
go down to the three bars on the bottom left and make sure to save preferences. you can then close that and go back to blender. it will now be one of your downloaded add-ons available! go to the top left again and hit file, import, and XNALARA / XPS. itll hover and youll see another option. make sure to pick XNALara/XPS Model (ascii./.mesh/.xps) . click it and pick Load an XNALara model file.
this will open up your file explorer within blender. click desktop and click on the higgs model you saved earlier. clicking it will lead to 2 files, click xps.xps . press Import in the top right. it will take a hot minute to pull everything into blender, be patient. once its imported scroll inwards and look at the son of a bitch. the rig is gonna be highlighted orange and hes gonna be gray. click to anywhere other than the model and face the enemy.
due to the shading settings, his textures arent showing. simply go to the top left where you see 4 ish circles, the second one should be selected. select the one to its right, viewport shading, and give it a second to load his textures in. its gonna look nothing like him. youre gonna have to fix the textures, brave soldier.
--
will post another tutorial if you decide to go through with this or if anyone does because unpacking all of that is such a pain in the ass but i promise it isnt rocket science. just not gonna do it if it isnt asked for because i spent 3 hours figuring out how to fix it the first time i imported his model -- the creator says nothing about this on the download or how to fix it unfortunately and its quite janky :(
if you even made it this far in reading, congratulations, youre a winner. IF YOU HAVE ANY QUESTIONS AT ALL PLEASE FEEL FREE TO ASK and i will answer them to the best of my ability.
SAVE THE IMPORTED MODEL TO REVISIT!!!!!!
#this took me so fucking long lmao#xnalara#blender#3d model#3d art#3d modeling#blender3d#ds higgs#higgs monaghan#higgs#death stranding higgs#tutorial#tut#tutorial blender#blender tutorial#xps#xnalara xps#Youtube
21 notes
·
View notes
Text
Mini React.js Tips #1 | Resources ✨

I thought why not share my React.js (JavaScript library) notes I made when I was studying! I will start from the very beginning with the basics and random notes I made along the way~!
Up first is what you'll need to know to start any basic simple React (+ Vite) project~! 💻
What you'll need:
node.js installed >> click
coding editor - I love Visual Studio Code >> click
basic knowledge of how to use the Terminal

What does the default React project look like?

Step-by-Step Guide
[ 1 ] Create a New Folder: The new folder on your computer e.g. in Desktop, Documents, wherever that will serve as the home for your entire React project.
[ 2 ] Open in your coding editor (will be using VSCode here): Launch Visual Studio Code and navigate to the newly created folder. I normally 'right-click > show more options > Open with Code' on the folder in the File Explorer (Windows).
[ 3 ] Access the Terminal: Open the integrated terminal in your coding editor. On VSCode, it's at the very top, and click 'New Terminal' and it should pop up at the bottom of the editor.


[ 4 ] Create the actual React project: Type the following command to initialize a new React project using Vite, a powerful build tool:
npm create vite@latest
[ 5 ] Name Your Project: Provide a name for your project when prompted.

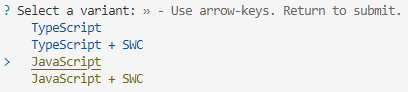
[ 6 ] Select 'React' as the Framework: Navigate through the options using the arrow keys on your keyboard and choose 'React'.

[ 7 ] Choose JavaScript Variant: Opt for the 'JavaScript' variant when prompted. This is the programming language you'll be using for your React application.
[ 8 ] Navigate to Project Folder: Move into the newly created project folder using the following command:
cd [your project name]
[ 9 ] Install Dependencies: Execute the command below to install the necessary dependencies for your React project (it might take a while):
npm install

[ 10 ] Run the Development Server: Start your development server with the command (the 'Local' link):
npm run dev

[ 11 ] Preview Your Project: Open the link provided in your terminal in your web browser. You're now ready to witness your React project in action!
Congratulations! You've successfully created your first React default project! You can look around the project structure like the folders and files already created for you!
BroCode's 'React Full Course for Free' 2024 >> click
React Official Website >> click
Stay tuned for the other posts I will make on this series #mini react tips~!
#mini react tips#my resources#resources#codeblr#coding#progblr#programming#studyblr#studying#javascript#react.js#reactjs#coding tips#coding resources
116 notes
·
View notes
Text
Adobe not genuine error? - Windows Edition (this works for any of my DLs)
Adobe just like many other companies, rebels against piracy with every fiber of their being, but luckily, I'm just that bit more stubborn. One of the most common issues with any Adobe program is its Adobe Genuine Software being a royal pain in the ass. So, let's block it from accessing the internet, alongside every other single part of Adobe that aids it in this process, so that it can't do its job, shall we? Now, since this is quite the extensive list of things to block (roughly 40 or so), I wanted to find a way to make it as easy as possible, so I was trying to expand my skills and see if I could make a little executable that adds every single IP/program to block to your Firewall for you. Luckily, I found a little file on GitHub (so full credit to them!) where someone already did it. However, I know that GitHub can be a little confusing for people, so I thought I'd lend a hand and run you guys through how it works step by step. Don't worry, it's very easy.
Download the file on the GitHub page. Or if you're unsure, and would rather get it through my Google Drive, then here you go.
Once downloaded, please extract the file. Anywhere works, your desktop, your download folder— as long as you can find it back and navigate to it.
Right click the file called WinMasterBlocker, and choose the option 'Run as Administrator' (this is very important!!) Note: It is likely that you will get a blue 'Windows protected your PC' popup window. Now, this is because this is a .bat file, and Windows is always wary of them as they contain commands that automate things within your system. But I know people can get worried over such warnings, so I want to offer reassurances through transparency. What this file will do on your computer is that it will automatically add 'connection blocks' like the one that I run people through doing manually over in this post, but over 40 of them in total. Yes, Adobe is that much of a pain. If you have trusted my DLs throughout the past years, and still now, I fully promise, and guarantee, that this is a perfectly legitimate thing, that will not any cause harm to your computer whatsoever. It is nothing malicious, and the only one who will 'suffer' from it, is Adobe. We don't like major corporations around these parts that force people to pay ridiculous amounts of money in 2025, while they did so much more fairly in the past. If you trust me, click on 'More Info' within the popup, and then 'Run Anyway' when it then pops up at the bottom. Once you do, you'll get a popup that you're likely familiar with, as it pops up every time when you run anything as an Administrator asking if you're sure. Click yes.
A new window pops up, a little black one, and I welcome you to your Command Prompt. This is a frequently used little thing by us techies, and it's what will automatically add all necessary lines/parts of Adobe to your Firewall as to restrict its internet access. When you boot it, you'll see a list, and you'll see that it says that if you want to block rules, to choose which 'vendor'. Do you see the '0: Adobe'? Good, because all you have to do is hit the number 0 on your keyboard, and press enter.
It'll take a little bit to for it to complete the process, as it's blocking over 40 connections one by one (you can minimize the window while it does this, do whatever you want to do on your PC, and check back in 5 to 10 minutes, don't worry).
At one point, you'll see that it'll note 'Completed blocking for Adobe', it will note the amount of rules that were added and 'Press any key to continue', you can simply X out of the window.
Restart your Adobe program (Photoshop or other), and enjoy!! If you encounter any errors, I would suggest you try this on a fresh installation of whichever program you've installed, and it might be needed to do a little restart. If you've tried both and you still encounter issues, feel free to message me, and I'll be more than happy to assist further!
#[ out of character. ] don't bend or water it down. don't try to make it logical. rather: follow your most intense obsessions mercilessly.#[ my resources. ] i sought to set my people free; from slavery to would-be-gods. i broke the chains of all who wished to join me.#[ /tips jack sparrow hat. ]#[ have a lovely pirating weekend ladies and gents! ]
2 notes
·
View notes
Text
A beginners guide to GIT: Part 4 - How to use GIT as 1 person
Table of content: Part 1: What is GIT? Why should I care?
Part 2: Definitions of terms and concepts
Part 3: How to learn GIT after (or instead of ) this guide.
Part 4: How to use GIT as 1 person
Part 5: How to use GIT as a group.
When it comes to not getting in each other's way, working alone is the simplest (It has a lot of other drawbacks). This is the simplest way to use GIT. You can do it with an external repository as a backup or just locally on your computer. It depends on how important your project is. If your laptop crashes tomorrow, which projects would you have a really hard time losing? Better to have an external backup for that. Github is often used for this (Maybe less now that Github makes machine learning AI’s, and so ARE stealing your code to train their AI on.) but you can also use Bitbucket (Which... may also steal your code...) and there are many many others out there. GIT is often used in certain patterns, called “workflows”. These have you working in more or less rigid ways to make it simple to work together. But since you are working alone, you do not risk others changing your code while you are working, so you can do it the simplest way :D
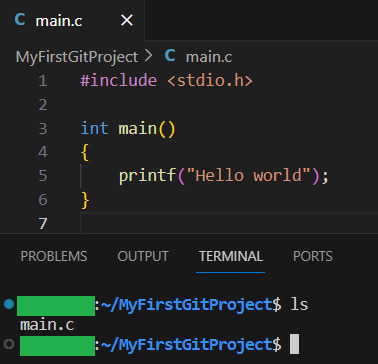
I will be doing a step by step guide that you can follow along. I will be doing it on a completely empty project and making a tiiiiiny program in C. This is because it is super simple. You do NOT have to know C to follow. You can also follow the steps with your own already existing project.
I PROMISE you, GIT cannot hurt you. Worst case scenario is that you fiddle around and break the repository part. (Meaning the files in the .git folder). But your files will always be safe.
(If you do not have git installed, check out part 3 for that)
First, I make a folder, navigate my shell into it, and call git init:
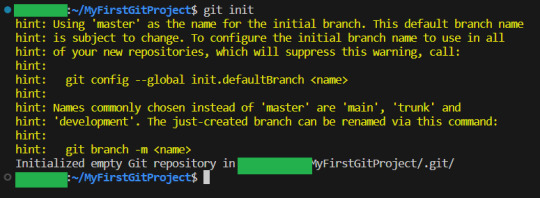
By the way, you can get used to GIT messages like this that tell you all your options, and explain what GIT has done for you. GIT is very good about giving you as much help and info as possible,
Now I will teach you the most important command in GIT.
It is more important than any other. Ready?
git status

This makes GIT tell you what git thinks is happening right now. What issues there are and what files are tracked, untracked or have been changed. Use this command often, especially while you are new to GIT, run it after every other command. It is how you learn what GIT is doing and thinking :3
Since our repo is empty it tells you what branch you are on (master. The only branch we will need since we are working alone)
and that you have not made any commits.
It also tells you the commands git think you will want to use on files. Since our repository is empty, it tells us to create some files, and then how to add them :3 So let's do that:
I have added my tiny program, as you can see:
Now let us see what GIT thinks we did:
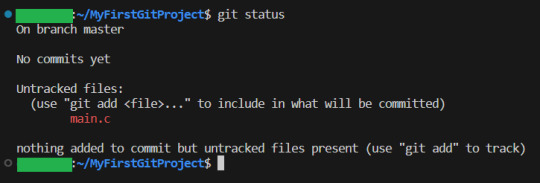
Now, since there have been changes, git shows us them.
Files can be untracked tracked and not changed (In which case, git status does not show them) tracked and changed.
Right now, main.c is untracket. Which basically means GIT have no idea about this file, other than it is in the folder.
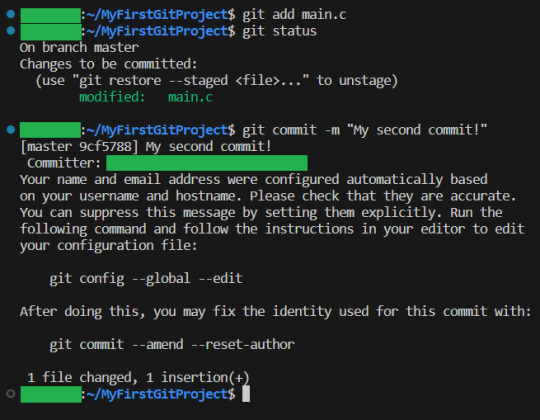
Ok, let us commit(save) the file. GIT tells us this is done with git add <File> . So we will write git add main.c
Then we use git status again to see what happened git status
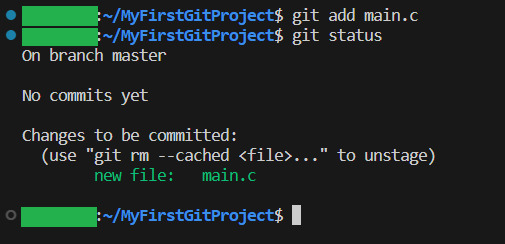
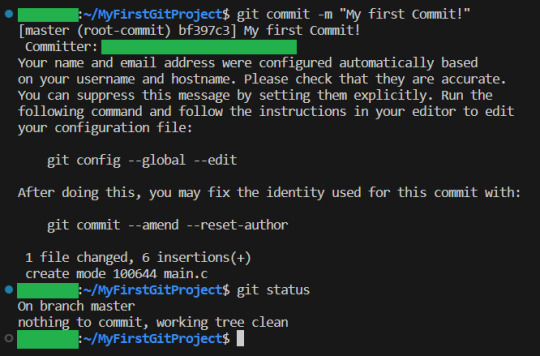
And yeah, our file is now ready to be committed. So lets do it! git commit -m “My first commit!”
The “-m” option is to write the git update explanation directly in the console instead of using an external program to do it. Done You have now committed your code! It is now saved!
git status shows that everything in the working tree is as it was last time we committed (Duh. We JUST committed)
I will now make some changes to the main file:

Git status shows us main.c was changed...but what if we wanted to know what was changed in more detail? How will we get status to do that for us? Let us find out! git help status
git then shows the help page for status And there we can see this part:

So if we write status with 2 -v arguments, we get all the details. Let us try:
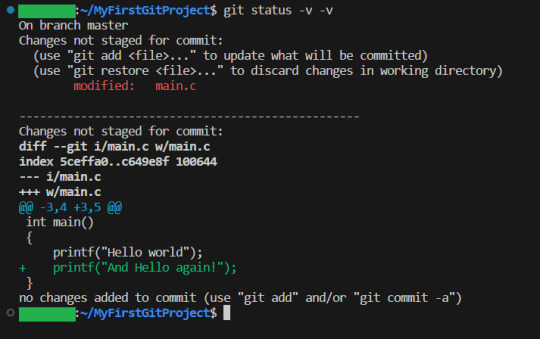
And look! It shows us EXACTLY what lines were changed! I stage the changes and commit:
And you have now learning enough about GIT to use it.. You now have all your work saved, in different commits. If you ever want to know all the commits you have made, write git log:

And if you want to know what a specific commit did, you copy the name of the commit, and write git show:

Now, everytime you want to save your work, you
1: Write/change the files you want
2: Add the files you want as part of this commit
3: make the commit These three steps are your workflow.
If you have a remote repository, then you add them steps
4: push to remote repository
To do this step, you can actually just write
git push
If you have set up a remote repository, then it just works. If you have not, then git will tell you what to do Whichever remote repository you use will tell you if you need to do other steps, like setting up passwords or ssh keys. They will also tell you how to set up the remote repository (That is not a GIT thing, that is a bitbucket or a github thing, so refer to whichever of those sites you want to use) And that is all! Every time you commit, your project is saved (it is smart to commit often, but usually only commit when your project can be compiled.) And whether you use a remote repository or not, you now have a fully valid GIT repository, and all the git tricks can be used on your project!
39 notes
·
View notes
Text
How To Back Up Your Computer Using Robocopy
So there are other walkthroughs out there, but all of them that I've seen assume the user has at least a certain minimum basic knowledge, to wit, doing command line stuff. I've been on computers since before the days of DOS (I started out on early Commodores) and have done tech support a few times in there, so I know what's basic knowledge to me is not that to other people, and particularly younger people. I'm going to attempt to explain this as if I assume you know nothing about any of the relevant things beyond "how to open file explorer".
Now, the most easy and basic backup you can do is just copying your stuff to a second location, not on the same device. Which might look like having your phone or tablet automatically backup stuff to a cloud service, or you copying files between a drive in your computer and an external drive or USB device. You might use software to have it happen automatically, either at specified times or continually in the background. You could just drag and drop relevant subdirectories by hand.
I'm going to explain a really simple way to create batch files that back up specific files from specific locations to specific locations, which you can run whenever you want to backup. So this is a somewhat automated manual backup. And for it I'll be explaining some basics of using robocopy, a Windows command line utility available in all recent versions of Windows (if you're running on a really old version, you need to go look up xcopy, which is essentially the same thing wearing a different name). It can do a ton of different things, but for this I'm going with dead simple, ignore all the unnecessary options instructions.
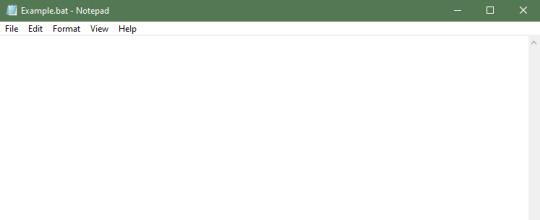
First (and biggest) question and answer that I assume is not common knowledge any more: how do you make a batch file? What even is it? A batch file is just a plain, unformatted text document that is a list of commands for the computer to run. You can create it using notepad, and most word processing programs can write to TXT format. A text file renamed from TXT to BAT becomes a batch file, which your computer can run. When creating a new batch file I mostly go to the subdirectory where I store all my batches, right-click and New -> Text Document, and then name it, being sure to change the extension (I have extensions enabled in my file views, because I'm an old foggy who prefers to see them and thinks it's stupid to hide them):
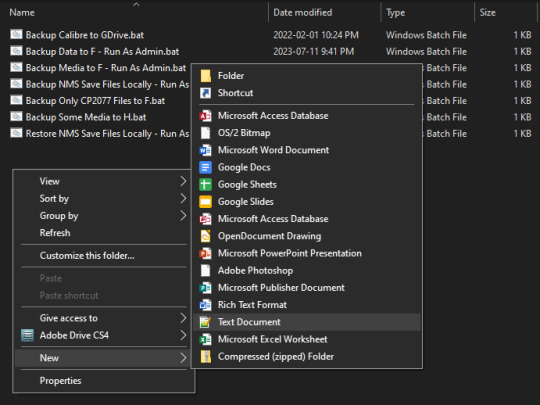
You'll get a pop-up confirming that you want to change the extension:

Note that I give the batches nice descriptive names so I'm sure of what each one does. Some of them are copying from protected spaces on my drive, so I need to right-click -> Run as Administrator in order to give the batches permission to access and copy those files, and I always note that in the file name to remind myself.
You can then right-click on the file name and choose "Edit" to open it in notepad. It'll be blank to start:
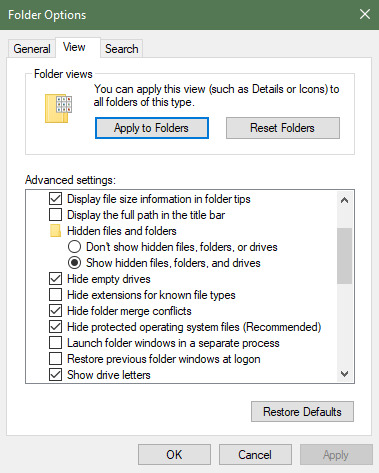
Also, in order to find relevant paths for the protected spaces, I have told the file explorer to show me hidden stuff, which you can do by using the "Options" menu found at the right end of the View bar in the file browser window:
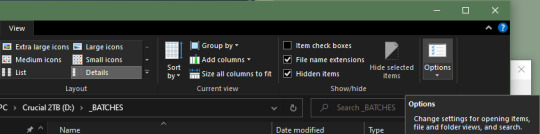
Note that I have the "Show" radio button selected, and a couple lines down from that have "Hide extensions" de-selected. Drive letters are also on, because we'll need them. I've also applied this setting to all folders.
So! We now can look around to find out what we want to backup, and have a currently empty text format BAT file to write the instructions we need in. Let's start with something easy - I bet most of you game, and probably a lot of those games are on a service like Steam or Origin, because these days there's not much choice about that. The first thing to do is find where your library of games is. In my case, I currently have Steam installed on D:, since that's my original SSD:
So what I want to do is go into that subdirectory, then right-click on the path in the navigation bar at the top and "Copy address as text":
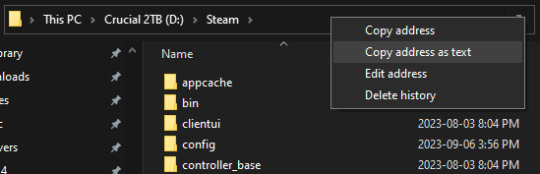
Then switch to notepad, where we're going to build a command line in our batch file. We want to tell it to use the robocopy command to copy this subdirectory and everything contained inside it to a different (external) drive, which in this case is my F: drive (a Western Digital 5TB drive from their Passport line of external drives). So we use some typing and some pasting (ctrl-v) and some editing to get the following line in the batch file:
robocopy "D:\Steam" "F:\Steam" *.* /mir
The *.* tells it "every file" and the /mir tells it to mirror, which means to copy over the existing files and file structure, so that the copy exactly matches what's currently in the starting location. When we first run this batch, it'll look at the starter location, see nothing matching it in the target location, and copy every single thing over as a new file or folder - this will take a bit of time. If you run it again several days later, it'll be much faster, since it will compare the starter location to what is in the target location, and only copy over files that are new or have changed, and will delete from the target location any files and folders that no longer exist in the starter location.
Now, since I have most of my games in a second library on my E: drive (it's PCIe format and therefore faster), I'd also add a line to the batch for that location as well:
robocopy "E:\SteamLibrary" "F:\SteamLibrary" *.* /mir
But what about stuff like save games or screenshots for some of the games I'm most invested in? Some of them will be stored in one of those two locations... some will not be. This is where having access to hidden locations comes in useful, because some times that where they can be found.
As an example of game saves, Cyperbunk 2077 stores its save games in a location inside my user space, which I can find under C:\Users\MYUSERNAME\Saved Games\CD Projekt Red\Cyberpunk 2077

So to backup those save files I would need to have a specific line for that in the batch:
robocopy "C:\Users\MYUSERNAME\Saved Games\CD Projekt Red\Cyberpunk 2077" "F:\MYUSERNAME\Saved Games\CD Projekt Red\Cyberpunk 2077" *.* /mir
Note that the target location path doesn't have to be an exact match for the starting location path - in this case, since I'll probably have multiple things inside my user space that I want to backup, I'll store those all in the same F:\MYUSERNAME subdirectory structure so I know where the heck to put them back if I need to restore. An example of this is that my local copy of my google drive files is also in the user directory, so to backup that I'd also have:
robocopy "C:\Users\MYUSERNAME\Google Drive" "F:\MYUSERNAME\Google Drive" *.* /mir
So by now our batch file will look something like this:
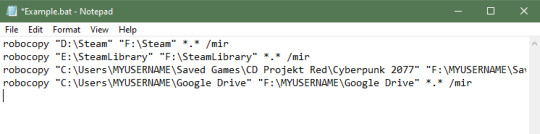
Further note - if you have tons of backup storage space, you can just backup your entire user space, though that'll likely include a lot of excess files you have no need for. This tutorial is mostly aiming for a more selective level of saving. Basically for anything you would miss if you lost it, figure out where on your drive(s) it is (which might be spread across multiple locations) and make sure those are all included in the batch.
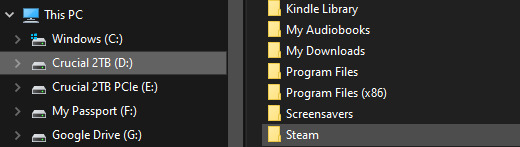
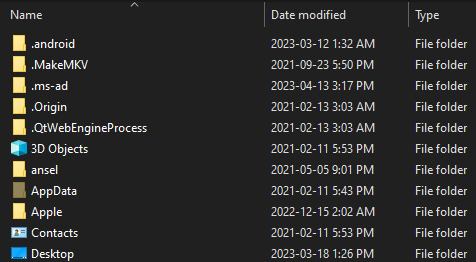
As an example of protected locations, note how the directory of what's in my user space has the folder for AppData greyed out - this is to let me know that's normally a hidden folder and files, and I should be extremely cautious when interacting with whatever is stored there (copying is fine, overwriting only if I'm sure I know what I'm doing - such as copying a file back to a subdirectory of it to restore an accidentally deleted file - and unless you really really REALLY know what you're doing, never delete stuff from it)):
Some games (and other software) do stick their save files under there, so for example to create a batch to only backup my No Man's Sky saves I have to burrow down into the AppData/Roaming files:
robocopy "C:\Users\MYUSERNAME\AppData\Roaming\HelloGames\NMS\st_76561197972583107" "F:\MYUSERNAME\AppData\Roaming\HelloGames\NMS\st_76561197972583107" *.* /mir
For my main data backup batch I just threw up my hands and mirrored the entire AppData structure, because so many settings and configuration files and save files and dictionary files for word processing and so forth are all hidden away under AppData (because they are all application data of one kind or another after all). Easier to just throw them all on the external drive, so if my laptop dies and I'm reinstalling stuff, I don't have that "ohcrap" moment of realizing I never backed up, say, the dictionary file I have any words specific to Dragon Age saved in for when i was writing fanfic in that universe (did that once, back in the days of yore when I was still using OpenOffice - thankfully my old drive was only dying, not dead, so I was able to get onto it and grab a few more files off of it).
When you finally have everything set up to your liking, save the file, then either double-click it to run it, or right-click and "Run as administrator" if you're accessing anything in protected locations. You'll likely get a popup confirming that it's okay for the batch to run, and then it'll sit there chugging away copying everything from all the starter locations to all the target locations.
Then just run it every time you want to make a backup, which should be some version or combination of whenever you've done something that made a big change (downloaded that new stupidly huge patch or game or whatever) and/or at regular intervals (end of every day, once or twice a week, once or twice a month, whatever). These will run much faster since the batch will only be making changes to the existing backup file structure, rather than creating a new one from scratch.
If you want the best backups, always have multiple backups - the 3-2-1 rule is always good to follow. At least three different copies, on at least two different media (not just multiple copies on one drive), with at least one of them being stored offsite (cloud storage, in a bank box, at someone else's house, etc).
Enjoy!
12 notes
·
View notes
Text
Warning: This is a very long, very tech related post, which expands on the post above in a very winding way. If that doesn't interest you, do not proceed.
I am a Gen Z systems administrator (IT guy, techie, etc. for those of you who have not heard the term before). And let's be clear, I didn't end up in this position because I'm some kind of computer genius freak who's been a compsci-doctorate level programmer since I was eight years old (I have been programming since I was ten, but it was pretty much at an age appropriate level). I can:
Use Google.
Withstand enough of Microsoft, and when the occasion calls for it Apple's, bullshit with enough patience to fix most problems.
Make use of available diagnostic methods and tools to isolate problems to specific programs and hardware in computers, which relates back to option one.
Read hard to read technical documents, logs, and discussions to get information that is not immediately clear.
I am very rarely innovating new methods of finding things. I rarely work on issues that no one has encountered or fixed before (although it has happened a few times, it happens to every sysadmin). The skillset I have is, on some level, interchangeable with every mechanic or technician for any machine ever made, including cars, ships, and planes.
And, ultimately, the need for that skillset is what's missing from computers nowadays. It used to be, to use a desktop, even on the most basic rudimentary level, required you to have some technical skill. Without a GUI, you would have to know how to load programs and navigate a filesystem in DOS. You would have to know how to un-park the heads on a disk, and park them when you were done. How to operate a modem.
Doing the basic stuff, up until like, Windows 7 (and the release of the iPhone, the first ever smartphone two years earlier), took some level of technical acumen. Want to mod a game? Have fun downloading janky third party mod packers and managers, and editing files manually inside the game config. Same problem for getting games as a whole. Buy the CD. Put it in your computer. Doesn't work because you have dependencies missing. The dependencies also have missing dependencies, which you then have to find. Packages are missing. So on and so forth. Keeping your stuff running the way you wanted was hard.
Now? Not so much. Windows does a lot in the backend on computer systems. As an example to contrast something I brought up in the previous paragraph is Steam, and other similar stores. One click to install with all dependencies, and one click to install mods. And more importantly, us sysadmins do even more shit on the backend on incredibly powerful commercial systems which are also very heavily integrated and automated. But it's all still there.
These systems, much like many things in our society, are designed to discourage user-level fixes. But you can still do it, even if everything has been designed to cut out that basic level skillset development.
What's really killing us here is that we're giving the very young highly commercialized and consumer oriented devices like iPads to play with, which reinforces this anti-problem solving, "there's always an app for that" style of thinking.
We can and should have those devices, don't get me wrong. There is a place for them where reliability is at a premium, and you just need things to work and be simple for performing low level tasks. I manage multiple construction companies, and a few of them make incredibly effective use of managed tablets and iPads for on-site management personnel, like foremen and project managers, to give a practical example. Easy to set up, easy to swap around, and easy to use with very low failure rates. Great for people who don't need to do super technical work but need to be very effective communicators.
But that's not what we should be teaching people on, because it ruins any chance at proper problem-solving thinking. What we want to train them on is a system that has room for failure, and room for troubleshooting. And that is where the open source and full desktop environments comes to the rescue.
If you want your kid to learn how a computer works, give them a locked down (or not-so-locked down, up to you) Windows PC. Or even better, give them a clean copy of Ubuntu on a laptop with a touchscreen to work with for their childhood. Shit will break, fail, go lopsided, bug out, etc. Part of the cost for using that device will, inevitably, be learning how to fix it, and also as they get older, fixing it themselves.
We can bring these skills back. But it means, like in all things, standing up and resisting the ever encroaching rise of corporations and their locked down technology.
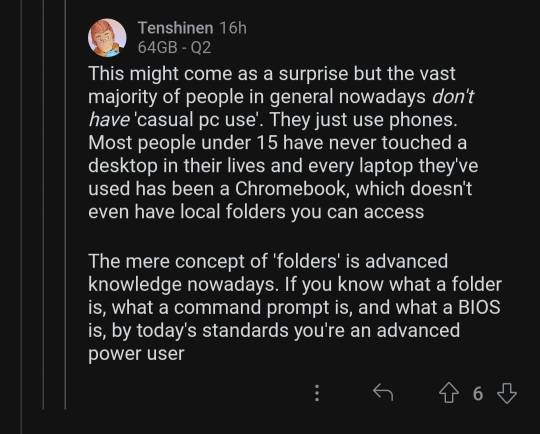
another thought about "gen z and gen alpha don't know how to use computers, just phone apps" is that this is intentionally the direction tech companies have pushed things in, they don't want users to understand anything about the underlying system, they want you to just buy a subscription to a thing and if it doesn't do what you need it to, you just upgrade to the more expensive one. users who look at configuration files are their worst nightmare
#sysadmin#it technology#technician#internet technology#computing#computers#windows#tech industry#text post#opinion piece#opinion
79K notes
·
View notes
Text
Effective Ways to Improve Your Laptop's Opening Time
Whether it is a project for school or college or you are keen to watch a movie, a slow-functioning laptop can wreck your productivity. The best part is, you likely don’t have to spend a ton of money or completely replace your laptop. With some tips and hacks, you can easily save your laptop's start time.
Here in this blog, we will go through efficient tips on how to accelerate your laptop's startup process and find out when you should get help from a laptop repair expert or find a nearby laptop repair center.

1. Disable Unnecessary Startup Programs
Disable Them
Each time you boot up your laptop, there is a list of applications that boot up in the background automatically. Most of them are not required and slow down the boot time.
Fix:
In Windows, use the keys Ctrl + Shift + Esc to open the Task Manager.
Under the Startup tab, turn off unnecessary programs.
Under Mac, go to System Preferences > Users & Groups > Login Items.
This simple step can cut down your boot time significantly.
2. Upgrade to a Solid State Drive (SSD)
If your laptop nonetheless has a spinning difficult power (HDD), consider upgrading to a strong-nation power (SSD). SSDs have considerably faster information-switch speeds and are plenty more green than HDDs, mainly when it comes to boot times and loading applications.
How it Helps:
SSDs have no moving elements, which results in rapid facts get entry to speeds.
They consume less power, which also aids in avoiding laptop overheating.
If you don't know how to upgrade, contact a professional laptop repair expert or use the services of a doorstep laptop repair facility that can upgrade it for you at your convenience.
3. Clean Up Your System
Your laptop picks up junk files, temporary files, and unused programs over time that clog your system and slow down your booting.
What You Can Do:
Use built-in utilities such as Disk Cleanup (Windows) or Storage Management (Mac).
Remove programs you don't use.
Scan with a good antivirus to detect malware, which can have a dramatic effect on performance.
4. Keep Your Operating System and Drivers Updated
Updates typically involve enhancements to performance, corrections to errors, or security additions. When your laptop takes a long time to boot, it might be because it has old drivers or system files.
Quick Tip:
Set your laptop to install updates automatically or look for updates every week.
Go to your manufacturer's site for model-specific driver updates.
5. Optimize BIOS/UEFI Settings
Your system's booting is managed by your BIOS or UEFI settings. Turning off unnecessary boot items or turning on "Fast Boot" will make boot times faster.
Warning: Proceed with caution when modifying BIOS settings. If in doubt, it is advisable to seek the help of a laptop repair professional or search for a laptop repair service near me that provides professional help.
6. Addressing Laptop Overheating Issues
If your laptop is running too hot, it can throttle performance and cause a longer time than usual to boot. Overheating is often caused by dust buildup, old thermal paste, or blocked airflow.
Solutions:
Use compressed air to clean the air vents.
Utilize a cooling pad.
If the issue continues, use a laptop overheating solution by a professional laptop repair technician.
A professional technician can replace thermal paste, clean internal parts, and make your device run more efficiently.
7. Limit Background Services and Visual Effects
Windows and macOS provide smooth visuals, but they can be at the expense of speed. Turning them off will make your laptop boot up and run quickly.
How to Adjust:
On Windows, navigate to System > Advanced System Settings > Performance Settings and choose "Adjust for best performance."
On Mac, limit motion and transparency under System Preferences > Accessibility.
8. Consider a New Operating System Installation
If all else fails, a clean install of your OS can breathe new life into your laptop. It removes all bloatware, malware, and conflicting files that may be slowing things down.
Before doing this, always back up your data and, if you’re unsure how to proceed, book a doorstep laptop repair service for a hassle-free experience.

Conclusion
Improving your laptop's opening time doesn’t always require advanced tech support through Rightcliq laptop repair service. Easy repairs such as turning off startup programs, installing an SSD, and regular upkeep can make all the difference. And if you get stumped, don't be afraid to look up a laptop repair service like RightCliq or call in a laptop repair expert who can have your computer running like new—sometimes without you even leaving your house, due to convenient doorstep laptop repair services.
Resource: https://rightcliqservices.blogspot.com/2025/05/effective-ways-to-improve-your-laptops.html
1 note
·
View note
Text
iTools Explained: Everything You Need to Know

If you’ve ever searched for an alternative to Apple’s iTunes, chances are you’ve come across a tool called iTools. But what exactly is iTools, and why do so many users prefer it over iTunes? In this article, we’ll break down everything you need to know about iTools — its meaning, its features, itools.us.com and why it has become a popular choice among iOS users.
What Is iTools?
Simply put, iTools is a third-party software designed to manage iOS devices like iPhones, iPads, and iPods. It acts as an alternative to iTunes but with a simpler, more user-friendly interface. The main purpose of iTools is to allow users to easily manage their music, videos, photos, apps, and more, without the restrictions and complexities often associated with iTunes.
iTools was created for users who found iTunes too complicated or limiting. It offers a streamlined experience that focuses solely on managing device content, rather than promoting music sales or subscriptions.
How Is iTools Different from iTunes?
While iTunes serves as both a media library and a content marketplace, iTools focuses mainly on device management. Here are some key differences:
Ease of Use: iTools is designed to be intuitive, making it easier for even beginners to navigate and manage their devices.
No Installation of Additional Software: Unlike iTunes, iTools doesn’t require you to install other software or plugins to perform basic tasks.
Lightweight: iTools is a much lighter program, which means it uses fewer system resources and runs faster.
More Flexibility: iTools offers more freedom when it comes to managing files, backing up data, and restoring your device without the usual iTunes limitations.
Main Features of iTools
iTools offers a wide range of features that help make managing your iOS device simple and effective:
Data Transfer: Easily move music, videos, photos, and documents between your device and your computer.
Backup and Restore: Create backups of your device data and restore it with just a few clicks.
App Management: Install, uninstall, or back up apps from your device.
Battery Master: Monitor battery health, temperature, and performance statistics.
Virtual Location: Simulate a fake GPS location on your iPhone without jailbreaking it, a feature not available in iTunes.
Ringtone Maker: Create custom ringtones using your favorite songs.
File Management: Browse and organize files on your device much like you would on a traditional computer.
Why Choose iTools?
iTools has gained popularity because it offers simplicity, speed, and convenience. For users who just want to manage their device content without getting tangled in the extra features and promotions found in iTunes, iTools is a refreshing alternative. It's especially useful for users who regularly need to transfer files, manage apps, or create custom ringtones without hassle.
Additionally, iTools supports a wide range of iOS versions and devices, ensuring that most iPhone, iPad, and iPod users can benefit from its features.
Conclusion
In a world where Apple’s iTunes can sometimes feel overwhelming, iTools offers a straightforward, lightweight, and highly efficient solution. Whether you're backing up data, transferring media, or managing apps, iTools simplifies the process and gives you full control over your device. If you're looking for an easy and reliable iTunes alternative, iTools is definitely worth considering.
1 note
·
View note
Text
Okay to be honest, 99% of users never need to access the BIOS. (Although if you do PC gaming, you may need to get in there to overclock your GPU. Though frankly they have apps for that too nowadays).
Anyway, BIOS is the very very very most basic level of firmware for your motherboard. When you turn on your PC, the BIOS is what tells everything what drive to use, how to boot up the operating system, how much memory you have installed, etc. When you see the splash screen on startup (AKA a screen that briefly displays the manufacturer name of your device, like "Dell" or whatever), the BIOS has already run. To access BIOS, you generally need to hold down a key when you first power on your device. Which key may differ by manufacturer, so just google "how to enter bios Dell" (or whatever your brand is, like Lenovo, Asus ROG, etc). But, uh, please don't actually change anything in your BIOS unless you know exactly what you're doing and why. It's a good way to make your device stop turning on forever.
Command line is much more useful. (You may also have heard terms like CMD, console, command prompt, CLI, shell, or terminal, and these are technically not all synonymous basically synonymous for your purposes.) It's what you see every movie hacker using, where it's a black window with nothing but lines of text and a blinking cursor. You can launch it by hitting your Windows button and typing "CMD".
Command lines are useful to do technical things more quickly than going through a graphical interface. For example, let's say you've finally decided to switch to Firefox. You want to do it tomorrow, but hey, you could at least get it donwloaded and installed tonight, right? So you could launch Chrome, navigate to "firefox.com" click Download, save file, go to your Downloads folder, doubleclick the executable, and click through the installation prompts. Or... you could launch CMD and type "winget install firefox -h && shutdown /s /t 0". When you hit enter, the Windows built-in package manager will download and silently install Firefox and will turn off your PC once it finishes.
The big learning curve for command lines is that, compared to a graphical interface where you have clickable buttons and pages that show you all your options, command lines generally require you to know what commands you want to run, and what syntax they take. Different command line programs require different command languages, too. Windows Command Prompt uses "CMD", but Windows also has a more advanced command line called Powershell, which uses the language "Powershell." You can also run Visual Basic scripts that use VBS or VBA. The thing that makes Linux so tricky for most people is that the command line terminal is your primary way of interacting with the computer, using the language "Bash". It requires a lot of memorization; when you first start using any of these, google and superuser.com are your friends.
this can't be true can it
#i love explaining shit to ppl. please feel free to send me asks if u have more questions#computers#how to use computers
99K notes
·
View notes
Text
It is difficult to say for sure why people give up playing modern games and get back to retro games that used to enjoy in childhood. Maybe, it’s just excessive romanticizing the good old days or mere nostalgia that makes us look back fondly on old things in the attempt to relive some pleasant experiences. If you’re one of those guys who aim to play retro games on their computers but doesn’t know how to do it, you can relax. You’re definitely going to learn how to do it after finishing reading the article. Abandonware Sites As a Key To The Lost MemoriesAbandonware is a term denoting outdated, currently unsupported software. Also, this term refers to the software whose copyrights are no longer protected. So, if you’re looking for old games you would love to play again, start searching for the websites offering such kind of product. Try googling for “abandonware” and the system will present you with lots of results. You may want to check some of them out to decide which site offers old games for download. Also, don’t forget to do a crosscheck on the source you plan on using. Who knows, maybe the site distributes malware under the guise of abandonware. So, stay vigilant. Reading some forums and familiarizing yourself with the list of the best websites offering abandonware can be quite a useful option, as well. Doing so will help you figure out what abandonware website to choose and assess the safety of downloads it offers. When you select the site hosting retro games don’t hesitate to visit it. Though different sites are organized differently, you always will be able to navigate through some sections and categories in order to pick a specific game you would want to download onto your computer. Once you find what you have been looking for, click on the game. As a rule, the next thing most users see after selecting the game on the site is its short description. Other users’ review also can be available. Though sometimes it’s may be difficult to locate the Download button, try your best to do it. Select the “Download” option, then. In some cases, you may be offered to postpone downloading and try playing the retro game in your browser. If you find it necessary to try this option first, you’re free to do it. Still, if you don’t want to limit yourself to playing online, it’s best that you download the retro thing onto your PC and play it whenever you feel like doing it. Now you can load your new old game and start enjoying it. Just locate it in your default Downloads folder and click on it. This should start unpacking the content of the file which is most likely to be zipped. If the system won’t do it automatically, try decompressing the file manually using any unarchiver you have installed. Playing Retro Games Using an EmulatorWe guess you know that you can also run old games on your PC using an emulator and ROM files. Besides, if you ever start looking for retro games, you can download ROMs from RomsMode for free. Still, will cover this part in detail a little bit later. Just keep on reading.To start playing retro games, look for an emulator online. This program will help your PC emulate the operation of original hardware intended for running old games. Once you find a reliable online source to download the selected emulator, click on the “Download” button and get the new software installed. Just like in the case of extracting abandonware files, you’ll need to unzip you emulator and extract its content to the proper folder. Do you remember about ROM files or games that you can play using an emulator? Now it’s time that you download some of them. Visit RomsMode and navigate through the available ROM files until you come across the retro game you would love to play. Download the chosen game. Then, launch the emulator, select the game in it and start playing!
0 notes
Text
Resolving Common Tax Issues: A Complete Guide for Taxpayers and Small Businesses
Navigating tax issues can be one of the most stressful challenges for individuals and small businesses. Tax laws are intricate, the paperwork is overwhelming, and dealing with the IRS can feel intimidating. Whether you're a taxpayer facing back taxes or a small business worried about IRS wage garnishment, understanding your options is critical.
This guide will break down common tax problems, explain various solutions like the IRS Fresh Start Program, and help you determine whether professional tax resolution services are right for your situation. By the end of this blog, you'll have the tools and insights needed to take control of your tax situation.
Understanding Common Tax Issues
Taxes are an inevitable part of life and running a business, but mistakes and complications can happen. You might miss filing deadlines, underreport income, or struggle to pay what you owe. These problems can escalate quickly, especially when the IRS imposes penalties or initiates legal actions like wage garnishment.
Yet, it’s important to remember you're not alone. Thousands of people and small businesses deal with similar challenges every year. Navigating tax issues starts with understanding the type of problem you’re facing and knowing your options for resolution.

Identifying Your Tax Problem: Common Scenarios
The IRS handles many kinds of tax problems, but some issues tend to be more common than others. Here are examples of situations taxpayers frequently encounter:
Back Taxes
Failing to pay your taxes by the due date can result in accumulating back taxes. Over time, penalties and interest can inflate the total amount you owe.
Tax Liens and Levies
If back taxes remain unpaid, the IRS may issue a tax lien (a claim against your property) or a levy (the seizure of assets like bank accounts or property).
IRS Wage Garnishment
The IRS can garnish your wages to recover unpaid taxes. This means your employer is required to withhold a portion of your paycheck and send it directly to the IRS.
Tax Penalties and Interest
Even small errors on tax returns, such as entering incorrect amounts or missing deadlines, can result in significant penalties and growing interest.
By identifying your specific situation, you can begin to explore solutions tailored to resolving your tax issues.
IRS Fresh Start Program: A Viable Solution?
The IRS Fresh Start Program is designed to make it easier for struggling taxpayers to resolve their tax debts. It’s an option worth exploring if you're dealing with significant arrears.
What Is the Fresh Start Program?
The IRS Fresh Start Program offers initiatives like installment agreements, offers in compromise (settling for less than the full amount owed), and penalty relief. These measures are intended to make tax repayment more manageable for individuals and small businesses.
Who Qualifies?
Generally, the program is available to taxpayers with outstanding tax debts who demonstrate financial difficulty. For example, if your tax debt is below a certain threshold and you meet specific income and expense criteria, you may qualify for relief.
How to Apply
Applying for the Fresh Start Program involves submitting the necessary IRS forms along with supporting documentation. It’s usually a good idea to seek professional guidance to ensure your application is complete and accurate.
Dealing with IRS Wage Garnishment
Wage garnishment can create an immense financial strain, but there are options to stop or reduce the garnishment. Here’s what to do if the IRS has begun taking a portion of your paycheck:
Understand the Process
The IRS will notify you before wage garnishment begins by sending you a series of notices. If unpaid taxes remain unresolved, the garnishment starts.
Respond to Notices Quickly
Don’t ignore IRS notices. Responding promptly can give you opportunities to negotiate or appeal the garnishment.
Explore Resolution Options
Depending on your financial situation, you might be able to stop garnishment through:
Payment Plans: Arrange a monthly installment agreement with the IRS.
Offer in Compromise: Negotiate to pay less than you owe if you qualify.
Fresh Start Penalty Abatement: Request relief for penalties associated with your unpaid taxes.
It’s often helpful to work with tax resolution services, especially if you’re unsure about the best course of action.
Tax Resolution Services: When to Seek Professional Help
While many tax problems can be addressed directly with the IRS, there are times when professional assistance is invaluable. Tax resolution services are backed by experienced professionals, including tax attorneys and enrolled agents, who specialize in resolving complex tax issues.
When Do You Need Tax Experts?
When your debt is substantial (e.g., over $10,000)
If you’re overwhelmed with IRS notices or legal actions
When your tax situation involves complicated issues like multiple years of unpaid taxes or audits
What Services Do They Offer?
Negotiating with the IRS on your behalf
Preparing and submitting applications for programs like the Fresh Start Program
Helping minimize penalties and interest
Representing you in case of audits or legal disputes
Hiring tax resolution services may save you significant time and reduce the stress of handling tax issues on your own.
DIY Tax Resolution: Steps You Can Take
If you prefer to tackle your tax issues independently, there are actionable steps you can take to resolve common problems:
1. Review IRS Notices
Carefully read all correspondence from the IRS to understand your specific issue and deadlines.
2. Gather Documentation
Organize necessary documents, such as past tax returns, receipts, and records of payments.
3. Contact the IRS
Reach out to the IRS directly. Their agents can provide guidance on payment plans, penalty relief, and other options.
4. Set Up a Payment Plan
If you can’t pay your debt in full, request a payment plan that divides your debt into manageable monthly amounts.
5. Correct Filing Errors
For errors on past returns, file amendments using Form 1040-X.
While DIY tax resolution is possible, it requires diligence and attention to detail. If the process becomes overwhelming, don’t hesitate to seek professional IRS tax help.
Resources for Taxpayers: IRS and Third-Party Assistance
There are numerous resources available to assist taxpayers:
IRS Resources
IRS.gov: Find forms, instructions, and detailed information about various programs like the Fresh Start Program.
Interactive Tax Assistant: Use this tool to get answers to common tax-related questions.
Taxpayer Advocate Service: Independent advocacy to assist in resolving tax issues.
Third-Party Resources
Tax Resolution Services: Companies with expertise in negotiating with the IRS on your behalf.
Local Tax Clinics: Many nonprofit organizations offer free or low-cost tax assistance for low-income individuals.
Taking Control of Your Tax Situation
Facing tax issues doesn’t have to feel like an insurmountable challenge. Whether it’s taking advantage of the IRS Fresh Start Program, dealing with IRS wage garnishment, or seeking professional tax resolution services, there are solutions for nearly every tax problem.
Remember, the sooner you address the issue, the more options you’ll have. Don’t wait for the problem to escalate. Take proactive steps today and explore the resources and strategies outlined in this guide to regain control of your finances.
Struggling with tax issues? Reach out to a trusted tax resolution service or visit the IRS website to get started with tools and programs designed to help.
0 notes
Text
Version 607
youtube
windows
zip
exe
macOS
app
linux
tar.zst
I made a hotfix on Thursday, v607a, now linked above, to deal with an issue saving the 'min/max time to count a file view' options when set to 'no limit'.
I had an ok week. I improved some quality of life, made file viewing statistics work in milliseconds, and we now have jpeg-xl support.
The new libraries we tested in the 'future build' last week seemed to go well, so those updates are folded into today's release. There are no special install instructions--just do it like normal. If you run from source, you'll want to rebuild your venv today to get Jpeg-XL support and some newer libraries generally. Users who only have Python 3.13 can also easily run from source today.
full changelog
highlights
I reworked the 'file viewing statistics' system this week. It ended up eating about half my work time, but I'm overall happy with it. The system is upgraded from second-resolution to millisecond-resolution, including its settings and system predicate, which isn't a big deal but it is nice to have--mostly, you can now set 'count as a view if you see it for 2500ms' rather than always having to use whole seconds. Also, the Client API can now see and alter file viewing statistics, including a new 'canvas type' to represent views on an external Client API viewer, if you wish to track those separately.
Thanks to some users, Jpeg-XL files are now supported! Jpeg-XL is one of the contenders for 'what image format do we use next?', and I think a pretty good one. It is basically jpeg but it can handle more colour depth/HDR, transparency, and optional lossless encoding, all while saving about 40% equivalent jpeg/png filesize. I understand it can also do animation (although we don't add that today), making it a potential 'capabilities superset' of gif as well. Jpeg-XL is not well supported in the ecosystem yet, but I hope that as more programs add it we'll see a momentum build, and hydrus does its part today.
I made a mistake when I defaulted the new 'show detailed info on the status bar when you have one thumbnail selected' setting to 'off'. It is now default 'on', and all users will be set to 'on' on the update this week. If you prefer it off, you can still set it under options->thumbnails.
You can turn off the last week's flat colour background for thumbnail ratings, if you prefer them bare, also under options->thumbnails.
A new checkbox under options->importing tells the client to not switch to the respective downloader page when you drag and drop a URL onto it.
A couple new checkboxes under options->media playback let you change how mpv navigates the new 'too many events queued' dump-out we've seen recently. If you have had this error, you might like to change the loop mode and/or turn off the error hook entirely and let me know how you get on. I also made the error handling less aggressive, so it should now be possible to re-attempt such a file in the same boot.
next week
I looked at the 'just a last bit of database code cleanup to do' work for duplicates auto-resolution, but there was more than I expected and I couldn't fit it in this week. So, I'll go for that first off. Maybe just a simple 'cleanup' week overall.
1 note
·
View note
Text
How to Write the Perfect PHP Script for Your Web Development Class
PHP (Hypertext Preprocessor) is a widely-used server-side scripting language that powers millions of websites and applications.
Its versatility, ease of use, and integration capabilities with databases make it a popular choice for web developers.
If you’re enrolled in a web development class, mastering PHP is essential for creating dynamic and interactive web pages.
In the initial stages of learning PHP, many students encounter challenges that can hinder their progress.
This is where AssignmentDude comes in. Offering expert assistance in PHP homework, AssignmentDude provides personalized support tailored to your learning needs with PHP assignment help.
Whether you’re struggling with basic syntax or complex database interactions, our team of experienced tutors is here to help you navigate through your assignments and enhance your understanding of PHP programming.
At AssignmentDude, we understand that mastering PHP requires practice and guidance.
Our services are designed to empower you with the skills needed to tackle real-world projects confidently.
From understanding fundamental concepts to implementing advanced features, our dedicated tutors are committed to helping you succeed in your web development journey.
As you embark on this learning path, remember that seeking help is not a sign of weakness but rather a proactive step toward mastering the art of programming.
With AssignmentDude’s support, you can overcome obstacles and develop a strong foundation in PHP that will serve you well throughout your career.
Understanding the Basics of PHP
Before diving into writing scripts, it’s crucial to understand the fundamentals of PHP. This section will cover the essential concepts that every beginner should know.
What is PHP?
PHP is a server-side scripting language designed primarily for web development but also used as a general-purpose programming language.
It allows developers to create dynamic content that interacts with databases and can handle user input effectively.
Why Use PHP?
Cross-Platform Compatibility: PHP runs on various platforms (Windows, Linux, macOS), making it versatile for different server environments.
Database Integration: PHP seamlessly integrates with databases like MySQL, PostgreSQL, and SQLite, allowing for efficient data management.
Open Source: Being open-source means that PHP is free to use and has a large community contributing to its continuous improvement and support.
Ease of Learning: The syntax of PHP is similar to C and Java, making it relatively easy for beginners to pick up.
Setting Up Your Development Environment
To start writing PHP scripts, you’ll need a suitable development environment. Here’s how to set it up:
Install XAMPP/WAMP/MAMP: These are popular packages that include Apache server, MySQL database, and PHP interpreter.
XAMPP: Cross-platform solution available for Windows, Linux, and macOS.
WAMP: Windows-specific solution.
MAMP: Mac-specific solution.
Create Your Project Directory:
Navigate to the htdocs folder within your XAMPP installation directory (usually found at C:\xampp\htdocs on Windows).
Create a new folder for your project (e.g., my_first_php_project).
Choose an IDE or Text Editor:
Popular choices include Visual Studio Code, Sublime Text, or PhpStorm. These editors provide syntax highlighting and debugging tools that enhance your coding experience.
Writing Your First PHP Script
Now that your environment is set up, let’s write your first simple PHP script.
Step 1: Create a New File
Open your text editor or IDE.
Create a new file named index.php in your project directory.
Step 2: Write Basic PHP Code
Add the following code to index.php:
php
<!DOCTYPE html>
<html lang=”en”>
<head>
<meta charset=”UTF-8">
<meta name=”viewport” content=”width=device-width, initial-scale=1.0">
<title>My First PHP Page</title>
</head>
<body>
<h1>Welcome to My First PHP Page!</h1>
<?php
echo “Hello, World! This is my first PHP script.”;
?>
</body>
</html>
Step 3: Run Your Script
Start the Apache server using XAMPP Control Panel.
Open your web browser and navigate to http://localhost/my_first_php_project/index.php.
You should see “Welcome to My First PHP Page!” followed by “Hello, World! This is my first PHP script.” displayed on the page.
Understanding Basic Syntax
PHP scripts can be embedded within HTML code. The opening tag <?php indicates the start of a PHP block, while ?> marks its end. Here are some key points about PHP syntax:
Variables: Variables in PHP start with a dollar sign ($). For example:
php
$name = “John Doe”;
echo $name; // Outputs: John Doe
Data Types: Common data types include strings, integers, floats, booleans, arrays, and objects.
Comments: Use comments to document your code:
php
// This is a single-line comment
/* This is a
multi-line comment */
Control Structures
Control structures allow you to control the flow of execution in your scripts.
Conditional Statements
Conditional statements execute different blocks of code based on certain conditions:
php
$age = 18;
if ($age >= 18) {
echo “You are an adult.”;
} else {
echo “You are not an adult.”;
}
Looping Statements
Loops enable repetitive execution of code blocks:
For Loop:
php
for ($i = 0; $i < 5; $i++) {
echo “Number: $i<br>”;
}
While Loop:
php
$count = 0;
while ($count < 5) {
echo “Count: $count<br>”;
$count++;
}
Working with Functions
Functions are reusable blocks of code that perform specific tasks.
Defining Functions
You can define functions using the function keyword:
php
function greet($name) {
return “Hello, $name!”;
}
echo greet(“Alice”); // Outputs: Hello, Alice!
Built-in Functions
PHP comes with numerous built-in functions for various purposes:
String manipulation functions like strlen(), str_replace(), etc.
Array functions like array_push(), array_merge(), etc.
Handling Forms and User Input
One of the key aspects of web development is handling user input through forms.
Creating HTML Forms
You can create forms using standard HTML elements:
xml
<form action=”process.php” method=”post”>
Name: <input type=”text” name=”name”><br>
Age: <input type=”number” name=”age”><br>
<input type=”submit” value=”Submit”>
</form>
Processing Form Data in PHP
To process submitted form data:
php
// process.php
if ($_SERVER[“REQUEST_METHOD”] == “POST”) {
$name = $_POST[‘name’];
$age = $_POST[‘age’];
echo “Name: $name<br>”;
echo “Age: $age<br>”;
}
Form Validation and Security
Always validate user input before processing it:
php
if (!empty($name) && filter_var($age, FILTER_VALIDATE_INT)) {
// Process valid input
} else {
echo “Invalid input.”;
}
Working with Databases (MySQL)
Integrating databases into your applications allows for dynamic data management.
Connecting to MySQL Database
To connect to a MySQL database using PDO (PHP Data Objects):
php
try {
$pdo = new PDO(‘mysql:host=localhost;dbname=my_database’, ‘username’, ‘password’);
} catch (PDOException $e) {
echo “Connection failed: “ . $e->getMessage();
}
Performing CRUD Operations
CRUD stands for Create, Read, Update, Delete operations on database records.
Create Operation
php
$sql = “INSERT INTO users (name, age) VALUES (:name, :age)”;
$stmt = $pdo->prepare($sql);
$stmt->execute([‘name’ => ‘John’, ‘age’ => 30]);
Read Operation
php
$sql = “SELECT * FROM users”;
$stmt = $pdo->query($sql);
while ($row = $stmt->fetch()) {
echo $row[‘name’] . “<br>”;
}
Update Operation
php
$sql = “UPDATE users SET age = :age WHERE name = :name”;
$stmt = $pdo->prepare($sql);
$stmt->execute([‘age’ => 31, ‘name’ => ‘John’]);
Delete Operation
php
$sql = “DELETE FROM users WHERE name = :name”;
$stmt = $pdo->prepare($sql);
$stmt->execute([‘name’ => ‘John’]);
Object-Oriented Programming (OOP) in PHP
OOP allows for more organized code through encapsulation and inheritance.
Defining Classes and Objects
You can define classes using the class keyword:
php
class User {
public $name;
public function __construct($name) {
$this->name = $name;
}
public function greet() {
return “Hello, {$this->name}!”;
}
}
$user = new User(“Alice”);
echo $user->greet(); // Outputs: Hello, Alice!
Inheritance in OOP
Inheritance allows one class to inherit properties and methods from another class:
php
class Admin extends User {
public function greet() {
return “Welcome back, Admin {$this->name}!”;
}
}
$admin = new Admin(“Bob”);
echo $admin->greet(); // Outputs: Welcome back, Admin Bob!
Error Handling in PHP
Handling errors gracefully is crucial for maintaining application stability.
Using Try-Catch Blocks
You can catch exceptions using try-catch blocks:
php
try {
// Code that may throw an exception
} catch (Exception $e) {
echo ‘Caught exception: ‘, $e->getMessage(), “\n”;
}
Best Practices for Writing Clean Code
Writing clean code improves maintainability and readability:
Use Meaningful Variable Names: Choose descriptive names for variables and functions.
Keep Functions Short: Each function should perform one task only.
Comment Your Code: Use comments judiciously to explain complex logic but avoid over-commenting obvious code.
Follow Coding Standards: Adhere to consistent coding standards such as PSR (PHP Standards Recommendations).
Advanced Topics in PHP
As you become more comfortable with basic concepts in PHP scripting, it’s time to explore some advanced topics that will enhance your skills further.
Working with Sessions
Sessions allow you to store user information across multiple pages during their visit to your website.
Starting a Session
To use sessions in PHP:
php
session_start(); // Must be called before any output is sent
$_SESSION[‘username’] = ‘JohnDoe’;
Accessing Session Variables
To access session variables on another page:
php
session_start();
echo $_SESSION[‘username’]; // Outputs: JohnDoe
Destroying Sessions
To end a session when it’s no longer needed:
php
session_start();
session_destroy(); // Destroys all data registered to a session
File Handling
PHP provides functions for reading from and writing to files on the server.
Writing Data to Files
You can write data to files using fopen() and fwrite() functions:
php
$file = fopen(“example.txt”, “w”);
fwrite($file, “Hello World!”);
fclose($file);
Reading Data from Files
To read data from files:
php
$file = fopen(“example.txt”, “r”);
$content = fread($file, filesize(“example.txt”));
fclose($file);
echo $content; // Outputs: Hello World!
Using Composer
Composer is a dependency manager for PHP that simplifies package management.
Installing Composer
To install Composer globally on your system:
Download Composer installer from getcomposer.org.
Follow installation instructions based on your operating system.
Using Composer
To create a new project with Composer:
Navigate to your project directory in the terminal.
Run:
bash
composer init
Follow prompts to set up your project configuration.
You can then require packages by running:
bash
composer require vendor/package-name
Security Best Practices
Security should always be a priority when developing web applications with PHP. Here are some key practices:
Input Validation
Always validate user inputs before processing them:
php
$name = filter_input(INPUT_POST, ‘name’, FILTER_SANITIZE_STRING);
$age = filter_input(INPUT_POST,’age’, FILTER_VALIDATE_INT);
if (!$age) {
die(“Invalid age provided.”);
}
Prepared Statements
Use prepared statements when interacting with databases to prevent SQL injection attacks:
php
$stmt = $pdo->prepare(“SELECT * FROM users WHERE email=:email”);
$stmt->execute([‘email’ => $_POST[‘email’]]);
$user = $stmt->fetch();
Password Hashing
Never store passwords as plain text; always hash them before saving them in the database:
php
$passwordHash = password_hash($passwordInput , PASSWORD_DEFAULT);
// Store `$passwordHash` in the database instead of plain password.
To verify passwords during login:
php
if (password_verify($passwordInput ,$passwordHash)) {
echo ‘Password is valid!’;
} else {
echo ‘Invalid password.’;
}
Debugging Techniques
Debugging is an essential skill for developers when things don’t work as expected.
Enabling Error Reporting
During development phases enable error reporting by adding this line at the top of your script:
php
error_reporting(E_ALL);
ini_set(‘display_errors’, 1);
This will display all errors directly on the page during development which helps identify issues quickly but should be disabled on production sites.
Using Debugging Tools
Tools such as Xdebug provide advanced debugging capabilities including stack traces which help trace issues back through function calls leading up until an error occurs.
Real-World Applications of PHP
Understanding how PHP fits into real-world applications will solidify your knowledge further.
Content Management Systems (CMS)
Many popular CMS platforms such as WordPress are built using PHP. Learning how these systems work can provide insights into best practices for building scalable applications.
WordPress Development: You might want to explore creating themes or plugins which involves understanding hooks and filters within WordPress’s architecture.
E-commerce Platforms
Building e-commerce websites often involves complex functionalities like user authentication systems along with payment gateway integrations which rely heavily on secure coding practices learned through mastering core concepts in PHP development.
Example Project Idea: Create an online store where users can register accounts; add products into their cart; checkout securely using payment gateways like PayPal or Stripe integrated via API calls handled through backend scripts written in php!
RESTful APIs
PHP can also be used to build RESTful APIs which allow different applications or services communicate over HTTP protocols seamlessly exchanging data formats like JSON or XML making it easier integrate third-party services into existing applications without much hassle!
Here’s an example snippet demonstrating how you might set up routes within an API built using php:
php
header(‘Content-Type: application/json’);
$requestMethod=$_SERVER[“REQUEST_METHOD”];
switch ($requestMethod) {
case ‘GET’:
// Handle GET request
break;
case ‘POST’:
// Handle POST request
break;
case ‘PUT’:
// Handle PUT request
break;
case ‘DELETE’:
// Handle DELETE request
break;
default:
http_response_code(405); // Method Not Allowed
break;
}
Common Pitfalls When Learning PHP
As you learn more about writing scripts in php here are some common pitfalls students often face along their journey!
Not Understanding Scope: Variables defined inside functions have local scope meaning they cannot be accessed outside those functions unless explicitly returned or declared global which leads many beginners confused when trying access them elsewhere leading errors being thrown unexpectedly!
Overusing Global Variables: While globals may seem convenient they make tracking down bugs much harder since any part could change its value at any time leading unpredictable behavior instead try pass values around via function parameters whenever possible!
Ignoring Security Measures: Failing implement proper security measures opens doors malicious attacks such as SQL injections so always sanitize inputs validate data before processing anything coming from users!
Neglecting Documentation & Comments: As projects grow larger keeping track becomes increasingly difficult without proper documentation so take time write clear comments explaining logic behind decisions made throughout codebase helps others understand intentions behind design choices later down line!
Not Testing Thoroughly Enough Before Deployment: Always test thoroughly before deploying anything live since bugs missed during development phases could cause significant issues once exposed real-world scenarios especially if sensitive information involved!
Conclusion
Writing perfect PHP scripts requires understanding fundamental concepts as well as best practices in coding standards while avoiding common pitfalls along way!
By mastering these skills through practice seeking help when needed — like utilizing resources from AssignmentDude — you can excel not only within classroom settings but also beyond them into real-world projects! Submit Your Assignment Now!
Remember that learning programming is an ongoing journey filled with challenges opportunities growth embrace each challenge as chance improve skills further!
If you ever find yourself stuck overwhelmed by assignments related specifically C++ don’t hesitate reach out AssignmentDude expert assistance tailored specifically students just like YOU! Together we’ll ensure success throughout entire learning process!
#do my programming homework#programming assignment help#urgent assignment help#assignment help service#final year project help#php assignment help#python programming
0 notes